Monday, 28 March 2016

Photoshop Shortcut key


Photoshop Shortcut key

Fill a layer____________ Alt+Del or Ctrl+Del (foreground/background)color.

Copy a layer________ Ctrl+J key

Invert selection_____________ Ctrl+Shift+I key

Increase/decrease brush size__________  ]/[ key

Increase/decrease brush hardness____________}/{ key

Lens correction_____________Shift+Ctrl+R key

Camera Raw____________Shift+Ctrl+A

Content aware scale________Ctrl+Shift+Alt+C

Blending modes___________Shift+(+) or (-)key

Cycle through open documents_______Ctrl+Tab

X key (Switch Colors) foreground and background colors

D key (Default Colors) — Reset your foreground and background colors to B/W.

Enable/Disable Layer Mask____ Shift + Click Mask

Change canvas size___________Ctrl+Alt+C key.

Save as______Ctrl+Shift+S key.

Group layer_____Select multi layers____Ctrl+G

Reverse mask_________Ctrl+I key.

Feather Selection______ Shift-F6


How to use perspective warp in photoshop cc


How to use perspective warp in photoshop cc

Ctrl + J key duplicate layer
Right click the duplicate layer__ Convert to smart object
Edit __  Perspective Warp


Left click anywhere the photo
Drag the four pin align the subject
Left click the photo again
Drag the pin until the blue line appear and then release the mouse


Drag the four pin align the subject
Set the option panel to Wrap
Adjust the control point


 Crop and adjust
Done 


Wednesday, 16 March 2016

HDR Vs Photomatix pro 5

HDR Vs Photomatix pro 5

 
Setup the camera for HDR shooting
Set the camera auto bracketing
Set the number of shots and Ev. compensation
Use the tripod and remote shutter release cable or link to computer
Start to shot.

Loading Bracketed Images
Select Load Bracketed Photos from the File menu. The Loading bracketed photos dialog displays.
Click Browse. A dialog displays prompting for location of the files.
Click OK.

General Merge to HDR Options
Align source images
Perspective correction
Crop aligned images
Maximum shift
Show options to remove ghosts(Don’t click)
Reduce noise on
Strength
Reduce Chromatic Aberrations

Options for RAW Files

Photomatix Pro offers additional options for RAW files.
These options are automatically available when RAW files are loaded.

Working with Single Image Files
Click Load Single Photo in the Workflow Shortcuts window
click Tone Mapping from the Workflow Shortcuts panel.

Options for Single RAW Image Files
When your single image is a RAW file, Photomatix must first convert the RAW data. The following options are available for pre-processing the RAW data.


Adjusting Images Using Tone Mapping or Exposure Fusion
Photomatix Pro provides access to HDR Tone Mapping and Exposure Fusion methods in one interface, with three main sections: Adjustments panel, Preview and thumbnail Presets.

Image Adjustment Workflow
1 Adjust the image to your liking
2 Process the image: When you are satisfied with the adjustments, click on the Apply button
3 Before saving it, you may use the options on the Finishing Touch palette in order to increase the  contrast of your image, sharpen it, or adjust the saturation of individual color
4 Save the image    Select File - > Save As.


Preset Thumbnails Panel
The Presets panel lists the available presets, showing a thumbnail preview of the effect of the preset on your image. When you click on a preset thumbnail, the Preview image is refreshed to show the result of
applying the settings of the selected preset.

Replace Selection with Source
Selecting the Area to be Replaced
To enable this feature, click the Selection Mode checkbox. The Polygonal Lasso is the default tool.


Finding the edges
Replacing the Selected Area---Right-click---A contextual menu appears.
When finished unclick selection mode

Automating with Batch Processing (For HDR Panoramic and HDR timelapse)
Photomatix Pro offers two different batch modes:
• Batch Bracketed Photos: Processes bracketed sets using HDR Tone Mapping and/or Exposure Fusion all
in one step, which can save you a lot of time when you have many bracketed sets to process.
• Batch Single Photos: Processes multiple single image files using Tone Mapping.

1 Clicking the Batch Bracketed Photos
2 Select a preset
3 Select the number of exposures to combine using the pulldown menu below the checkboxes.
4 Select source folder
5 Set Destination
6 Click run


Sunday, 6 March 2016

俄罗斯相机

俄罗斯相机

Zorki相机也生产自KMZ,它也是二战之后,徕卡II最初的复制品。
但Zorki继续发展出自己独特的变化。


就好象徕卡一样,他们是测距相机。原泽尼特单反相机垄断了Zorki相机的市场。
现在 Zorki已经不再生产,但可在网上以大概30美元的价格购买。
由于采用橡胶快门,在拍摄照片时,他们会发出一种非常独特的声音。


FED也是测距相机,它也是徕卡II的复制品。不过,FED拥有自己的公司,并曾在二战前生产过相机。

该公司的历史是非常有趣的。它的基地位于现代的乌克兰,在20世纪30年代,它甚至生产过限量版相机给斯大林的秘密警察。

FED和Zorki都使用M39镜头卡口 – 又称徕卡主题安装或LTM,有着一样的螺钉安装。

从理论上讲,早期的徕卡相机,FED和Zorki都可以使用相同的镜头。


Thursday, 3 March 2016

Print size PPI and DPI

Print size PPI and DPI


Resolution refers to the number of pixels in an image.
Resolution is identified by the width and height of the image as well as the total number of pixels in the image.
PPI: Pixels per inch.
Most commonly used to describe the pixel density of a screen (computer monitor, smart phone, etc…) but can also refer to the pixel density of a digital image.
DPI: Dot’s per inch.
The number of dots in a printed inch.
The more dot’s the higher the quality of the print (more sharpness and detail).
 
The basic equation for calculating PPI is:
PPI = height(pixels)/ height of image (inches).
So, for example, if you want to print a 4-inch-by-6-inch image, and your pixel count is 800 x 1200, you need to divide 800 (the pixel height) by 4 (the photo height) and then divide 1200 (the pixel width) by 6 (the photo width).
 
The PPI will be 200, providing you with good quality photos.
However, if you want to print a larger photo, for example 8-inch-by-10-inch photo, the PPI reduces to 100 for width and 120 for height, giving you lower quality prints

Photography spots in Singapore

Photography spots in Singapore


Alkaff Mansion
Bukit Timah Saddle Club
Changi Boardwalk
Chinese & Japanese Gardens
Dempsey Hill
Emerald Hill
Fort Canning
Gardens by the Bay
Helix Bridge
Henderson Waves Bridge
HortPark
Lim Chu Kang Jetty
Lorong Halus Wetland
Lower Peirce Reservoir
Macritchie Reservoir
Marina Barrage
Malan Road
Marina Bay Sands Infinity Pool
Marina South Pier
Merlion/ Fullerton/ Raffles Place.
Mount Faber
National Gallery Singapore
Portsdown Road
Punggol Beach
Raffles Marina Lighthouse
Singapore Art Museum
Sungei Buloh Nature Reserve
Singapore polo club
Tanglin Hill Brunei Hostel
The Pinnacle@Duxton
Upper Seletar Reservoir
Victoria Concert Hall

Understanding Light

Understanding Light

2 types of light sources natural light and artificial light.

How to use natural light?
How to use artificial light?
How to mixed together to use?

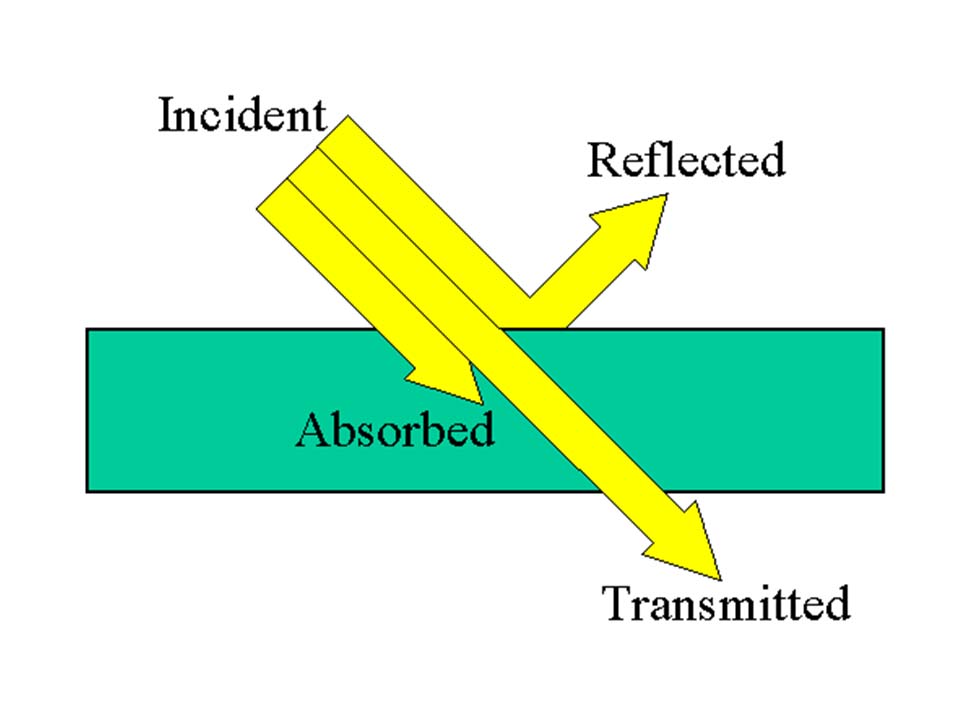
Light properties: Absorption, reflection and transmission.


4 Basic Characteristics of Light
Intensity
Quality
Direction
Color temperature


The angle of incidence is equal to the angle of reflection.


Two main factors determine the quality of light is the size and its distance from the subject.


In photography, the golden hour (sometimes known as magic hour) is a period shortly after sunrise or before sunset during which daylight is redder and softer than when the Sun is higher in the sky.